“There are two ways of spreading light: to be the candle or the mirror that reflects it.” — Edith Wharton
Can you believe we’re coming to the end of Summer in the Son — our online study of the Gospel of John? We’ve got just one week left! And wait til you hear what’s coming next… I’ll be sharing more soon!
If you missed it, be sure to check out Monday’s post, full of encouragement for tough times — 10 Reasons to Take Heart! And here’s our special VBS project for this week…
Fun Friday Craft:
We’ve been talking about the sweet fragrance of Christ — reading the Scriptures about how we carry that fragrance with us everywhere we go. (2 Corinthians 2:14) We also know that Jesus is the Light of the World, and we’re called to reflect His light. (John 8:12, Philippians 2:14-16)
So what could be better for this Fun Friday than a scented candle craft?
I found this idea on Pinterest and adapted it by adding color to the candles. I also made some interesting discoveries about the process that weren’t in the original instructions…. I’ll share them below.
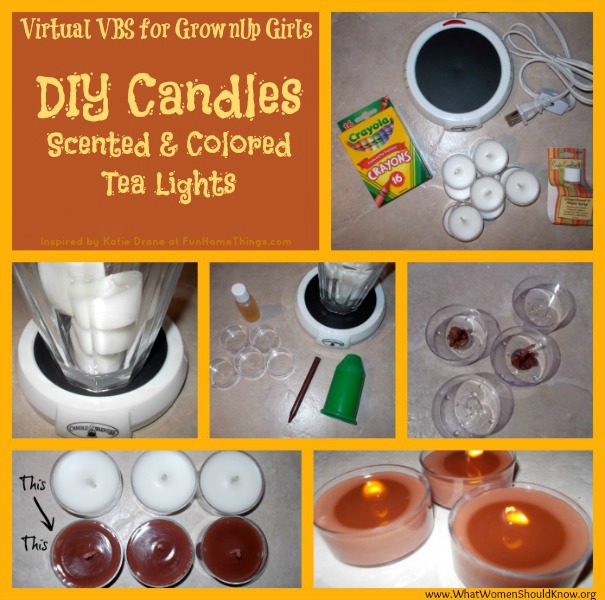
The idea is to transform plain, ordinary, unscented tea lights into beautifully colored, scented candles. This is a just-for-fun thing — I don’t think it really saves money, because even the dollar store has scented tea lights now. It certainly doesn’t save time. But it is fascinating that you can do this… and it opens up all kinds of other creative possibilities!
You need:
— generic tea light candles
— candle warmer or coffee warmer (available at Walmart or Target or most craft stores for $4 or $5)
— scented oil (again, Walmart or Target — but more varieties at a craft store, $2-$7)
— crayons or wax dye (the craft store had wax dye, but I chose crayons because I was originally going to do this with my nephews and I thought they’d think it was cool — also crayons are also a lot cheaper! You don’t even need half of one.)
— glass jar to melt the candles in
The basic instructions are simple enough:
1. Take the tea lights out of their plastic or metal casings and remove the wicks.
2. Melt the candles in the glass jar on the candle warmer. The instructions I used said “approx 1 hour” — but see below.
3. As the wax turns to liquid, add a few drops of scented oil and some crayon shavings (or wax dye) and stir them together.
4. Then carefully pour the hot liquid back into the casings and let the candles cool. Voila!
I made my candles brown because my nephews had chosen the “gingerbread and maple syrup” fragrance oil at the craft store. Then they went to a Rays game with their dad instead of doing crafts with their Auntie in time for her to get her blog post up — though as it turned out, that may have been for the best. Next time, I’ll know to do a few things differently…

1. I could not figure out how to “simply” remove the wicks from the tea lights. When I pulled gently on the metal bases, they separated from the wicks — which were stuck in the wax. My solution was to start over with fresh candles, wait until the wax had melted some, and then fish the wicks out with tweezers. MESSY! It doesn’t help that brown isn’t the most appetizing color. Next time I’ll add the crayon shavings at the end. And choose a color that’s not … brown.
2. This is an hour and half into the process. I think it’s because I couldn’t find a wide-bottomed glass jar for the candles to melt in. The candle warmer does get very hot, but only the wax closest to the surface of the warmer turns to liquid. So you really need a wide base. I’d also consider cutting up the candles into chunks (more surface area) to speed up the process. If I was doing this with children, I’d want to have other activities planned for this time.
3. I was growing old, waiting for these silly things to melt — so I decided to help them along. I took the glass to the microwave and put it on medium power for about a minute or so (watching it carefully). That did the trick! I brought the glass back to the warmer, stirred the wax a few times — with a plastic coffee stirrer instead of the tweezers — made sure I was happy with the amount of scent and color, and then poured it over the wicks in the casings. Hooray!
It really is kind of cool to transform something like this… there are all kinds of teachable moments, if you’re doing it with kids (and even if you’re not!)… and it could be a great way to get the colors you want for a birthday party or baby shower or something :)
What do you think?